
Shoopy pricing covers five fields on every product — Sale Price, MRP, Purchase Price, Tax, and HSN Code. In short, these decide what the shopper pays, what your invoice prints, what your supplier bill reads, and how your GST report adds up. Also, Shoopy validates them with light rules so bad data doesn’t slip through.
For a live Shoopy storefront with a wide range of pricing, see www.cauverypowers.com. For adding a product end-to-end, see Adding a product in Shoopy. For variants that can override pricing per row, see Shoopy product variants.
Before you begin #
- First, sign in at
web.shoopy.in. For details, see Logging in with OTP. - Also, your role must allow catalog edits. In short, Owner, Admin, Catalog Manager, Marketing Manager, or Billing Manager can set pricing.
- However, Location Admins can view but not edit pricing.
- Finally, any plan — including Free — can set Sale Price, MRP, Tax, and HSN. No upgrade needed for these four fields.
Shoopy pricing fields at a glance #
| Field | Required? | Where it shows up |
|---|---|---|
| Sale Price | Required for Simple and Bundle products | Product card on the storefront; order line total |
| MRP | Optional, recommended | Strike-through price on the product card; discount percentage |
| Purchase Price | Optional, hidden by default | Purchase Orders; internal cost tracking (never on customer invoice) |
| Tax Group | Optional | Invoice breakdown; GST report |
| HSN Code | Optional, recommended | Invoice and GST report |
So, set Sale Price first, then MRP if you want to show a discount. Also, set Tax Group and HSN together — they travel as a pair on your GST invoice.
Sale Price and MRP in Shoopy pricing #
Sale Price is what the shopper pays. In short, it’s the number that lands on the order. Also, Shoopy enforces one rule — Sale Price can’t exceed MRP when MRP is set.
MRP (Maximum Retail Price) is the printed price on the packaging. Then, if you set an MRP, the storefront strikes it through and shows Sale Price as a discount. For example, an MRP of ₹999 with a Sale Price of ₹799 displays as “₹999 ₹799” on the product card.
Validation rules #
- Sale Price is required on Simple and Bundle products. So, blank saves fail with “Sale price is required”.
- MRP is optional. However, if you fill it, Shoopy enforces Sale Price ≤ MRP. Violations fail with “Sale price cannot exceed MRP”.
- MRP blank = no cap. Therefore, leaving MRP empty lets any Sale Price pass — handy, but you lose the discount display.
Tip: Fill MRP whenever the product has one. Then, shoppers see a discount and Shoopy can calculate discount %.
Multipack is different #
For Multipack products, Sale Price sits on each pack option, not the parent. So, the top-level Sale Price field is optional on a multipack. For more, see Shoopy product bundles and multipacks.
Purchase Price in Shoopy pricing #
Purchase Price is what you pay your supplier — your cost per unit. Unlike Sale Price, it’s a private field. In short, shoppers never see it and it does not print on the customer invoice.
Where Purchase Price shows up #
- Hidden by default. Purchase Price is an optional field. So, if you don’t see it on your Add Product form, an Owner or Admin can switch it on from the Product Fields panel (the settings icon next to Additional Fields on the product form).
- Per product and per variant. Once enabled, Purchase Price appears on the product form and on each variant row.
- Flows into Purchase Orders. When you record stock coming in, the Purchase Price prefills on each Purchase Order line. Therefore, keep it current to track cost accurately.
Purchase price includes tax #
Shoopy shows a second inclusion switch next to Purchase Price — Purchase price includes tax. It works like the Sale Price switch, but applies to your supplier-side math. So, Sale and Purchase can follow different conventions if that matches how your supplier bills you.
Note: Purchase Price never prints on customer-facing invoices. So, it is used only for Purchase Orders and internal cost tracking.
Tax — inclusive vs exclusive in Shoopy pricing #
Indian GST pricing has two conventions:
- Inclusive — the Sale Price already contains the tax. So, ₹118 Sale Price with 18% GST = ₹100 base + ₹18 tax.
- Exclusive — the Sale Price is before tax. So, ₹100 Sale Price with 18% GST = ₹118 on the invoice total.
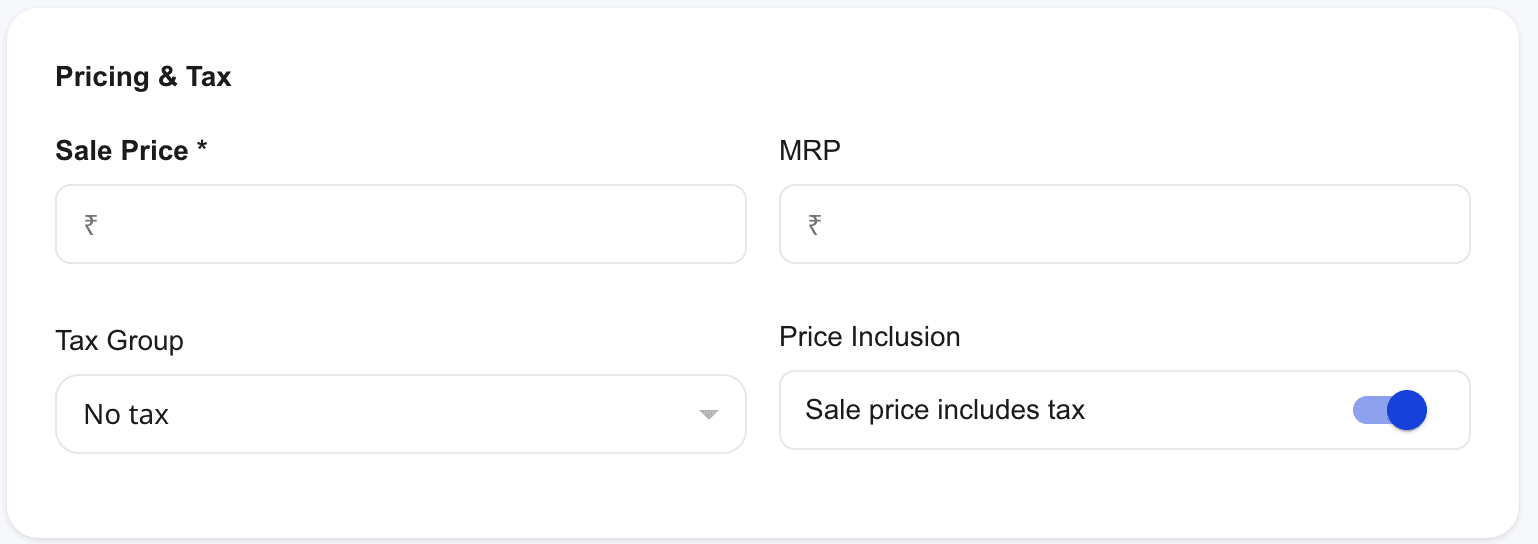
The Price Inclusion switch #
Under the Sale Price row, Shoopy shows a switch labelled Sale price includes tax:
- On (default) — Sale Price includes tax. The invoice shows “X% Incl.” and the order total equals Sale Price.
- Off — Sale Price excludes tax. The invoice shows “X% Excl.” and the order total = Sale Price × (1 + tax/100).
In short, flipping this switch changes the arithmetic on every downstream invoice. Therefore, pick your convention early and stick with it across the catalog.
Note: The switch only takes effect when a Tax Group is assigned. With Tax set to “No tax”, the switch is cosmetic.
Picking a Tax Group for GST in Shoopy pricing #
The Tax Group dropdown on each product is where you pick the GST slab. Standard Indian slabs are 0%, 5%, 12%, 18%, and 28%. Also, Shoopy stores the CGST/SGST/IGST split behind the scenes from your tax group, so your invoice breaks the tax into the right sub-heads.
- In the product form, open the Tax Group dropdown.
- Pick the slab that applies to this product (for example,
GST 18%). - Save.
Then, the assigned group flows into every order, invoice, and GST report for this product.
If you can’t find the right slab #
Tax groups are managed at the store level. So, if your dropdown is missing a slab, an Owner or Admin needs to add it under Store Settings → Tax. Once added, every product form sees it.
No tax — the default #
A new product opens with Tax Group set to “No tax”. So, until you change it, no tax lines appear on that product’s invoice. For GST-registered stores, set a real Tax Group on every product before going live.
HSN code in Shoopy pricing #
HSN (Harmonized System of Nomenclature) is the code that identifies a product class for GST reporting. For example, 1905 covers bakery products and 6109 covers t-shirts.
Where to enter HSN #
The HSN Code field sits in the Pricing section of the product form. Also, it’s a plain text field with no dropdown — type the code that matches your product.
- Optional but recommended. In short, without HSN, your GST report cannot classify the sale.
- Commonly 6 digits. Indian GST usually prints 4, 6, or 8-digit HSN codes depending on your turnover and product category.
- No format check. However, Shoopy does not validate digit count — so double-check before saving.
HSN on variants #
Variants inherit the parent product’s HSN when left blank. So, set HSN once on the parent and variants use it automatically. Then, override per variant only if a specific colour or size falls under a different HSN.
Currency and the ₹ symbol in Shoopy pricing #
Shoopy uses one currency per store. Also, the symbol appears on every price field in the admin and on the storefront.
- Default: ₹ (Indian Rupee).
- Configurable at the store level: Owners can change the symbol under Store Settings.
- No per-product currency. In short, every product on one store shares one currency.
Therefore, if your store sells in a different currency, change the symbol once in Store Settings — you don’t need to touch individual products.
How Shoopy pricing flows to orders and invoices #
Here’s what happens once a shopper buys:
- Cart line uses Sale Price from the product (or variant).
- Tax math uses the Tax Group. Inclusive prices split out the tax; exclusive prices add tax on top.
- Invoice prints the Sale Price, tax slab (e.g.,
18% Incl.), and HSN on each line. - GST report groups orders by HSN and tax slab for filing.
So, a clean product — with Sale Price, correct Tax Group, and HSN — generates a filing-ready invoice. Conversely, a product with “No tax” and blank HSN creates a line that won’t show up correctly on GST reports.
Tips for Shoopy pricing #
- Always set MRP when one exists. So, the storefront shows a real discount.
- Pick Inclusive pricing for retail, Exclusive for B2B. In short, retail shoppers don’t want to see tax split; B2B customers do.
- Audit new stores before launch. Also, a quick filter on Tax Group = “No tax” flags products that will ship without GST.
- Use 6-digit HSN minimum. Then, your invoices stay compliant for GST-registered customers.
- Pricing changes don’t retro-update past orders. Past orders keep the price they were placed at. So, raising a Sale Price doesn’t re-bill old orders.
Troubleshooting #
“Sale price cannot exceed MRP” #
You typed a Sale Price higher than MRP. Therefore, either raise the MRP or lower the Sale Price. Also, leaving MRP blank removes the check if you really want Sale Price to stand alone.
Invoice total is off by the tax amount #
Check the Price Inclusion switch. In short, if the switch says “Sale price includes tax” but you entered the pre-tax number, the invoice math will be wrong by exactly the tax. Therefore, flip the switch and re-save, or re-enter the price at the right convention.
“No tax” shows up on my invoice even though I set GST #
You set the Tax Group on one product but shipped an order before saving, or Tax Group is “No tax” on a related variant. So, open the product, confirm Tax Group, and also check each variant.
HSN is blank on my GST report #
HSN is a per-product field. Therefore, open the product and fill HSN Code. Also, for a store with many gaps, use bulk upload to fill HSN across rows — see Shoopy bulk product upload via CSV.
My tax slab isn’t in the Tax Group dropdown #
Tax groups are store-level. So, an Owner or Admin has to add it under Store Settings → Tax. Then, the product form picks it up immediately.
Related articles #
- Adding a product in Shoopy
- Shoopy product variants
- Shoopy product bundles and multipacks
- Shoopy bulk product upload via CSV
- Product images and video in Shoopy
- Glossary of Shoopy terms
Category: Products & Catalog · Author: Shoopy Team · Last reviewed: 2026-04-23